
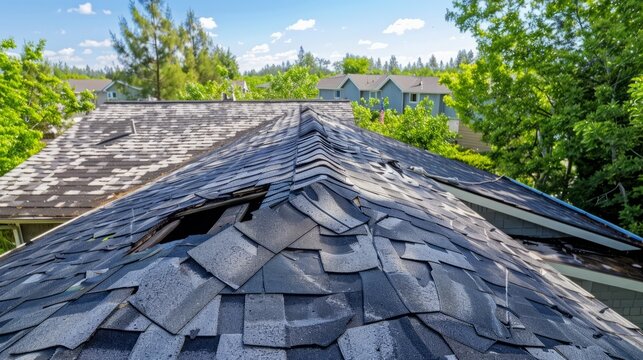
A hailstorm rolls through in ten minutes, but the damage it leaves can quietly eat away at a roof for months. Shingles bruise, granules wash into the gutters, and seals crack in ways you cannot see from the driveway. By the time a stain shows up on a bedroom ceiling, water has usually been getting in for a while. That is exactly why emergency hail damage restoration matters: the faster your roof is protected, inspected, and documented, the less the storm ends up costing you.
This guide explains what emergency hail damage restoration actually involves, how to tell whether your roof was hit, the five steps a professional crew follows, how repair compares with replacement, and how to work with your insurance company without losing money or time. If a storm just passed over your neighborhood, start with the five steps and save the rest for later.
What Counts as Emergency Hail Damage Restoration?
Emergency hail damage restoration is the fast-response work that stops a storm-damaged roof from getting worse and then returns it to a sound, watertight condition. It is not just a patch. It is a sequence that begins with temporary protection, moves into a documented inspection, and ends with permanent repairs or a new roof system.
The word “emergency” matters because hail damage is time sensitive. Bruised and fractured shingles let rain reach the underlayment and decking. Exposed fiberglass mats age quickly under Texas sun and heat. Dented vents and gutters can send water exactly where it should never go. Every week you wait, the damage spreads, and your insurance conversation gets harder because the adjuster has to separate storm damage from ordinary wear.
Professional hail damage restoration covers the whole roof system, not only the shingles. That includes flashing, vents, skylights, gutters, and any soft metals that show impact marks. A crew that only looks at the shingles will miss half the story.
Signs Your Roof Took a Hit From Hail
Hail is rarely dramatic from the ground. Golf-ball-sized stones leave obvious wreckage, but one-inch hail, roughly the size of a quarter, is already large enough to damage many asphalt roofs. Once the storm passes and it is safe outside, look for these signs:
- Dents on metal: Dimples on gutters, downspouts, vents, and roof-edge metal often show hail strength even when the shingles look fine.
- Granule loss: Dark, bare spots on shingles or a heavy pile of grit at the bottom of a downspout point to surface damage.
- Bruising: Soft, round spots that feel like a bruise on fruit mean the mat underneath is fractured.
- Cracks and missing pieces: Split or missing shingles, especially along ridges and exposed slopes, are common after severe storms.
- Spatter marks: Clean, oxidation-free circles on siding, mailboxes, or old paint show where stones struck.
- Interior clues: New water stains, damp insulation, or a musty smell in the attic suggest the roof is already leaking.
Do not climb onto a wet or damaged roof to check. Photograph what you can see from the ground, walk the property for dented metal, and check the attic with a flashlight. A trained inspector can get on the roof safely and find what a ground check misses.
How Hail Size and Wind Change the Damage
Not every storm hurts a roof the same way. Stones under an inch may only scuff granules, while hail between one and two inches can bruise and fracture asphalt shingles. Anything larger can punch straight through the mat. Wind matters too. Hail driven sideways at speed hits harder and tends to concentrate damage on the slopes facing the storm, which is why one side of a roof often looks far worse than the rest. Age also plays a role, because older shingles lose flexibility and crack more easily on impact. When you request emergency hail damage restoration, tell the inspector which direction the storm came from and roughly how large the stones were. Those details show where to look first and support the storm timeline your insurer will want to see.
The 5 Steps of Emergency Hail Damage Restoration
Reliable contractors follow a similar order. Knowing it helps you tell the difference between a real restoration plan and a quick sales pitch.
Step 1: Make the Property Safe and Stop Active Leaks
The first job is protection. If water is already getting in, the crew installs emergency tarps or temporary sealing over exposed areas and clears loose debris and broken material. Interior damage, such as wet insulation or stained ceiling drywall, is noted so it can be handled quickly. Temporary protection is generally treated as part of limiting further loss, so keep every receipt and ask your adjuster how it is handled under your policy.
Step 2: Complete a Full Roof Inspection
Next comes a top-to-bottom inspection. The inspector checks every slope, marks hail hits, tests suspect shingles, and examines flashing, penetrations, gutters, and soft metals. Many carriers evaluate damage by counting hits inside a ten-by-ten-foot test square on each slope, so a methodical count matters. A good inspector records the size, location, and pattern of impacts and notes the roof’s age and material.
Step 3: Document Everything for Your Claim
Photos, measurements, slope diagrams, and written notes turn an opinion into evidence. Date-stamped images of each damaged area, close-ups of bruised shingles, and shots of dented metal all help. Ask for a written report you can share with your insurer. Clear documentation is the best defense against a claim being under-scoped or denied.
Step 4: Meet the Adjuster and Agree on Scope
When the adjuster visits, having your contractor present is smart. The contractor can point out damage the adjuster might overlook, explain why a repair will not hold on a brittle, hail-battered roof, and confirm what a full scope of work should include. This is where honest, experienced roofers earn their keep, because they know what local building codes and manufacturer instructions require.
Step 5: Complete Permanent Repairs or Replacement
Once the scope is approved, the crew moves to the permanent fix. That may mean replacing damaged shingles and flashing, or tearing off the roof and installing a new system with fresh underlayment, proper ventilation, and drip edge. The job should end with a magnetic nail sweep, a clean yard and driveway, and a final walkthrough with photos of the finished roof. Keep the warranty paperwork, because it protects you long after storm season passes.
Repair or Replace After a Hailstorm?
After hail, the big question is whether repairs will do or the whole roof has to go. The answer depends on how widespread the damage is, how old the roof is, and what the material can tolerate. Use this comparison as a starting point.
| Factor | Spot Repair | Full Replacement |
| Extent of damage | A few isolated hits on one slope | Widespread hits across several slopes |
| Roof age | Young roof with plenty of life left | Older roof near the end of its service life |
| Shingle condition | Flexible, sealed, easy to match | Brittle, bruised, or discontinued color |
| Timeline | Often finished in a day | Usually several days, weather permitting |
| Upfront cost | Lower | Higher |
| Long-term value | Limited if hidden damage remains | Fresh warranty and full protection |
| Insurance outlook | Typically limited to clearly proven damage | Often approved when damage passes the carrier threshold |
A word of caution: brittle shingles are hard to repair without causing more damage, and matching the color of an older roof is often impossible. If your roof is past midlife and took a heavy hit, replacement is frequently the sounder long-term decision. If only one or two slopes were affected, a targeted repair can be entirely reasonable.
How Emergency Hail Damage Restoration Works With Insurance
Most homeowner policies cover hail damage, but the details vary, so read yours before storm season peaks. A few points come up again and again for Texas homeowners:
- Filing windows: Many policies set a deadline, often one year from the date of loss, so do not wait to file.
- Separate deductibles: Wind and hail deductibles are frequently a percentage of your dwelling coverage rather than a flat dollar amount, which can make them far larger than your standard deductible.
- Actual cash value versus replacement cost: Actual cash value pays after depreciation, while replacement cost coverage pays to rebuild at current prices minus your deductible.
- Duty to limit damage: You are generally expected to take reasonable steps to prevent more loss, and tarping is the classic example.
Call your insurer, open the claim, and share your contractor’s documentation. Keep one folder with photos, invoices, and a log of every conversation. Be careful with any contractor who promises to waive or absorb your deductible, because Texas law prohibits that practice. The right partner explains your options, documents damage honestly, and lets the claim stand on the facts.
Build Back Stronger With Impact-Resistant Materials
Restoration is also a chance to prepare for the next storm. Class 4 impact-resistant shingles are tested under the UL 2218 standard, where a two-inch steel ball is dropped onto the roofing sample from about twenty feet. To earn the rating, the sample must show no cracking. These shingles cost more than standard products, but they can reduce repeat repairs, and many insurers offer premium discounts for them. Ask your carrier what discount applies before you buy.
Other upgrades are worth discussing too. Standing-seam metal resists cracking well, though it can dent cosmetically. Impact-rated skylights, heavier-gauge gutters, and quality underlayment all add protection. Better ventilation helps the whole system age gracefully, which matters when summer heat cooks a roof for months at a time.
Mistakes That Make Hail Damage Worse
Small missteps after a storm can turn a manageable claim into an expensive headache. Avoid these:
- Waiting to see if leaks appear: Hidden moisture can rot decking and grow mold long before a stain shows.
- Hiring the first door-knocker: Storm chasers often disappear after the job. Check the license, insurance, local address, and references first.
- Letting an untrained person climb up: Wet, damaged roofs are dangerous, and careless foot traffic can add damage.
- Accepting a quick patch on a badly hit roof: A cheap fix can fail in the next storm and leave you with no coverage.
- Discarding evidence: Keep photos, receipts, and any removed materials until the adjuster has finished.
Frequently Asked Questions
How soon should I start emergency hail damage restoration?
Start within days, not weeks. Protect the roof and schedule an inspection right away, then contact your insurer promptly. Quick action limits water intrusion and makes it easier to prove the damage came from a specific storm.
Can hail damage a roof that looks fine from the ground?
Yes. Bruises, fractured mats, and early granule loss are often invisible from below. A professional inspection is the only reliable way to know, and it costs far less than finding rot later.
Will homeowners insurance pay for hail damage?
Usually, yes, subject to your deductible, coverage type, and policy terms. Read your policy for wind and hail deductibles, and ask your agent how depreciation is handled on a roof of your age.
How long does the restoration process take?
Tarping and inspection can happen within a day or two. Repairs may take a single day, while a full replacement often takes several days. Insurance approval and material availability can add time.
Do I need an inspection if I see no leaks?
Yes. Leaks are a late symptom. Hail can weaken a roof for months before water finds a path inside, and an inspection also creates records that support a claim within your policy’s filing window.
Conclusion
Hail gives no warning, but you control what happens next. Protect the roof, document the damage, work with your insurer, and choose materials that can handle the next storm. Acting quickly on emergency hail damage restoration keeps a small problem from becoming a major repair bill. If your home was hit, the team at J. Leonard Roofing and Construction can inspect the roof, document the damage, and guide you through every step from tarping to the final walkthrough. Call (817) 966-5580 or book your roof assessment today.